In the previous three installments in this DIY series about How To Update the Family Bowrider, we outlined the rationale behind the project (see PBC 32-4), we tackled the biggest piece: replacing the old two-stroke outboard with a new four-stroke (see PBC 32-5); and we added a watersports tow tower (see PBC 33-1).
In this issue we take on the task of choosing and repairing a used boat trailer so we can safely tow our project boat around to lakes we want to travel to, and to transport it to have some fiberglass restoration and protection work done by Provive that we’ll share more about in a future issue.
Boat trailers are purpose-built for their application, they rarely see any real amount of mileage or road usage, and they last a long, long time. In short, people buy and keep their boat trailers, so finding a used boat trailer that will suit your boat, within the timeframe you need it in, is sort of like finding the proverbial “needle in a haystack”. That’s not to say there aren’t good deals out there, but when you find one you better act quickly as it’ll be gone tomorrow. (If a trailer is still there a few weeks after you first saw it – there’s usually a good reason.) Here’s how to know what you’re looking for, avoid any scams, and thus know when you’ve found a great deal.
Our project boat was a 1998 SeaSwirl 208 bowrider that measured about 21 feet long, and under 8 feet wide so we didn’t need a wide load permit in Ontario. The original manufacturer spec sheet said the boat weighed 1,820 lbs. We needed to know what it weighed with the new Suzuki 150hp engine, the Monster Tower, a full tank of gas and safety gear, so we took a trip to our local landfill. Once across the weight scales with our truck, trailer and boat, and a second time across with just the truck and empty trailer, told us that our boat actually weighed in at 2,034lbs. So we needed a trailer to accommodate a 2,100 lb boat, plus the trailer’s weight, which meant we were looking for a trailer with up to roughly a 2,500-2,800 lb capacity. This is just under the weight where we would require trailer brakes – an additional coast and maintenance consideration.
A boat trailer has three essential components: the frame, the axle and the tires. We’ll get to the rollers versus bunks debate in a bit. Each main component in turn will put an upper limit on the total weight the trailer can safely carry – the total weight includes the weight of the trailer, the boat, the motor and the gear all combined.
Frame Construction
When buying a used boat trailer, I suggest you start by looking at the frame. If it is undersized for your needs, or has weakened or repaired welds, simply keep searching. Typical used boat trailers are made from one of two metals – steel or aluminum – that is formed into one of four shapes – I-beam, C-channel, round tube or square/rectangular tube. Aluminum frames are great for salt water use and usually feature an I-beam construction that makes it easy for running new wiring for lights. However an aluminum frame typically needs to be larger than a steel frame to carry the same weight, and may have issues with electrolysis where the aluminum frame meets up with the steel springs or axle mounts. C-channel steel frames also make for easy re-wiring and it’s easy to see if there is any weak spot in the construction or welds compared to square tube frames where the inside of the tube can hold moisture (even with drainage holes) that can rust and weaken the frame. Round steel tube frames are found on smaller or home-built boat trailers and have a much lower weight rating compared to a same size square tube frames. Look at the frame from every angle – even getting down on one knee to look at the frame horizontally – to make sure that it is “square”, not twisted or bent because of an accident or bad welding repair. If you can, a “test tow” down the road a mile or so will tell you if it tows straight and true behind your tow vehicle – if not, it may be a sign of a previous accident. Steel frames may be galvanized, or can be painted to help prevent rust. Watch that new paint isn’t hiding a recent repair. If the trailer is a tilt version, make sure you check that it does in fact tilt, and isn’t seized in place.
Take a look at the ball coupler as a part of the frame. Couplers can be purchased separately and bolted or welded onto the trailer frame. That’s good news if the one on the trailer you’re looking at is damaged. It’s bad news if a seller has up-sized the coupler to suggest that the trailer can handle a larger weight rating. A Class I coupler fits a 1-7/8” ball for trailers up to 2,000 lbs, while a Class II+ coupler fits a 2” ball or larger for trailers over 2,000 lbs. Make sure that the ball and hitch receiver on your tow vehicle, and the vehicle itself, are both properly equipped to tow the trailer – even for short distances.
Axle and Tires
If you’re satisfied with the frame, next look at both the axle and tire ratings together as a complete set which is the way they function. Be careful, sometimes a used trailer will feature a new axle and some unscrupulous seller may have put a higher weight rated axle under a frame that can’t carry it. Check a comparable manufacturer’s website to see that the axle rating and frame size match. Axle ratings are per axle – not per tire – so a 3,000 lbs axle can carry a maximum of a 3,000 pound load.
Trailer tires, like the trailer itself, are purpose-built. Do not use car tires as trailer tires. Trailer tires have a maximum load range stamped on the sidewall that you must stay within for safety, and typically come mounted on 12” to 16” steel rims with four-bolt or five-bolt patterns. Tire ratings are per tire – so two tires with a rating of 1,760 lbs at 50 psi could carry a combined maximum load of 3,520 lbs (trailer, boat, motor and gear). For both trailer tires and axles it’s always better to upsize to a capacity larger than you need.
Bunks Versus Rollers
The debate will rage on for years as to which type of hull support design is better. In Canada, our boats spend at least half the year or more out of the water and stored on our trailers. Rollers offer less resistance when launching or retrieving the trailer, and touch less surface area on the hull if you’re trying to do maintenance out of the water. Bunks however, offer greater support over a wider area and are less likely to produce spider cracks in the gel coat or stress the stingers, and this is even more true if the trailer has more than the traditional two bunk design.
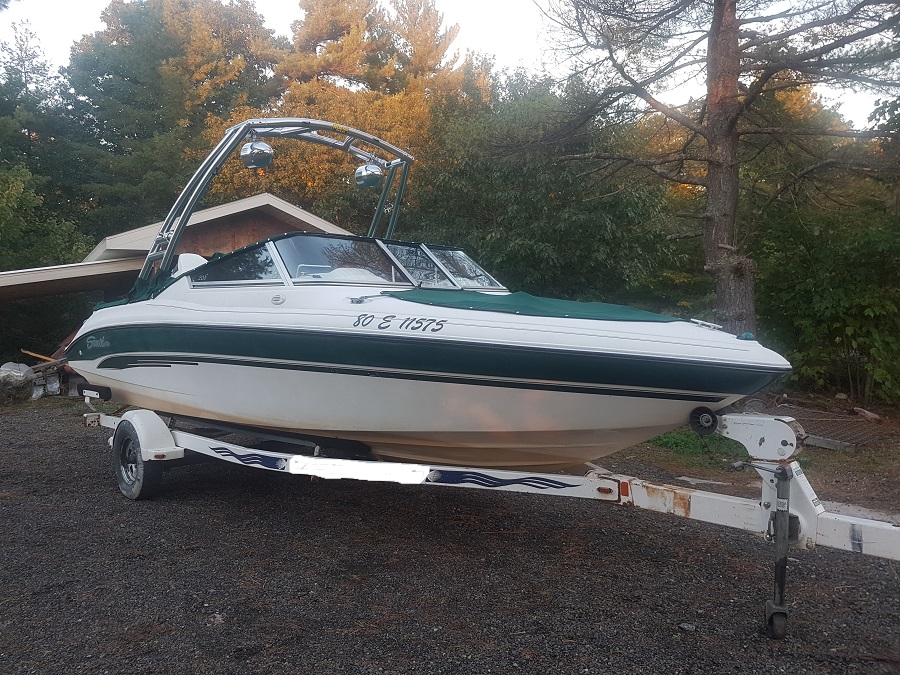
Our Tale of Two Trailers
When we first purchased the boat, it came without a trailer. We grabbed the first used trailer we could find online that would work – for now. It was a welded C-channel flatbed model with a 3,500lb axle and new-ish 15” tires. The previous owner had added two 4×4 carpet wrapped bunks on adjustable supports. It was a big bulky “Red-Green-Special” and had the boat sitting up really high off the ground, making for difficult launching and retrieving at shallow water ramps. To make it easier to centre the keel over the centreline rollers during haul out, I added a pair of centering guides by attaching PVC pipes with u-shaped clamps to a pressure treated 2×6 that I then bolted to the rear cross-member of the trailer. This trailer functioned. It worked to allow us to pick up the boat when we bought it, transport it home and get this project started, but it was far from ideal.
We actively searched various online buy-and-sell websites for over a year to find a suitable used boat trailer that would be lower to the ground, easier to use at the launch ramp and had a weight capacity to safely handle the load. We found a used single axle that had its’ original paint and decals, very few stone chips (indicating light use), two adjustable long carpeted bunks, two horizontal positioning bunks, with tires that were in good shape and lights that worked. We picked it up for about a third of the price of what it would have cost brand new. After about an hour launching and retrieving the boat repeatedly at the launch ramp on a quiet morning, we got the bunks adjusted to cradle the hull perfectly, the horizontal positioning bunks at the stern into place, and we’d moved the winch post forward enough to get the hull centred over the axel correctly, resulting in a good tongue weight that produced a smooth ride when towed. The drive-on and drive-off simplicity would be most welcome to keep me out of the cold water in the early spring and late fall.
After Purchase Checklist
While it’s not always possible, always look for a sticker on the frame somewhere that indicated the year of manufacture, length and weight rating. Failing that, check the manufacturer’s website for comparable new trailers and check their specs to see if the used model you’re considering at will meet your total weight requirements safely.
Every used trailer purchase is a compromise. Inevitably the lights won’t work, or the wiring connector will have to be redone for your vehicle. My experience having rewired and “futzed and fiddled” with many trailers lighting configurations for years, is that it’s far faster, less frustrating and less expensive to get all new lights (the sealed LED bulbs are far superior to the traditional incandescent ones) and new wiring and do it correctly, than to mess with the old lights. While you’re at it, replace the carpet on the bunks, and the old weather-ravaged winch strap with a new one. Check your provincial regulations for what brakes and perhaps clearance lights you need based on the length and width of your trailer.
The only real moving part on a trailer is the wheel bearings. There is no avoiding this messy job when you first get a new-to-you trailer because you don’t know what maintenance has or hasn’t been done. Be sure to disassemble and inspect the bearings (replace as necessary), repack with waterproof grease, and reassemble before dropping your boat on the trailer and heading off down the highway. Many a good day has been ruined because a bearing that has sat for years, and didn’t have enough grease in it, seized under the weight and heat load of highway speeds. Spend the extra couple of bucks and tap a set of genuine Bearing Buddies into your hubs with a wooden block and hammer. (In my experience, the no-name models don’t fit correctly and the centrifugal force spins them off on the highway.) They sure make the job of re-greasing the bearings the next time significantly cleaner, faster and easier.
When you find a used trailer that will suit your needs, be sure to properly register the ownership into your name, and get a trailer plate with the correct specs listed on it in case you’re stopped on the highway. Finally, whether your boat is on it, or the trailer is sitting alone, use a robust locking devise to ensure it will be there when you return. Update your insurance policy to cover the new-to-you trailer.
What’s Next?
In the next installment in this mini how-to series, in our Spring Issue (33-3), we’ll choose and show you how to hook up the tower speakers to a new Fusion Stereo and amp, replace the old speakers in your boat, add a Lowrance HDS Carbon fishfinder, and wire in some cool LED courtesy lights, as we continue to update the family bowrider.