
In the previous two installments in this DIY series about How To Update the Family Bowrider, we outlined the rationale behind the project and tackled the biggest piece: replacing the old two-stroke outboard with a new four-stroke.
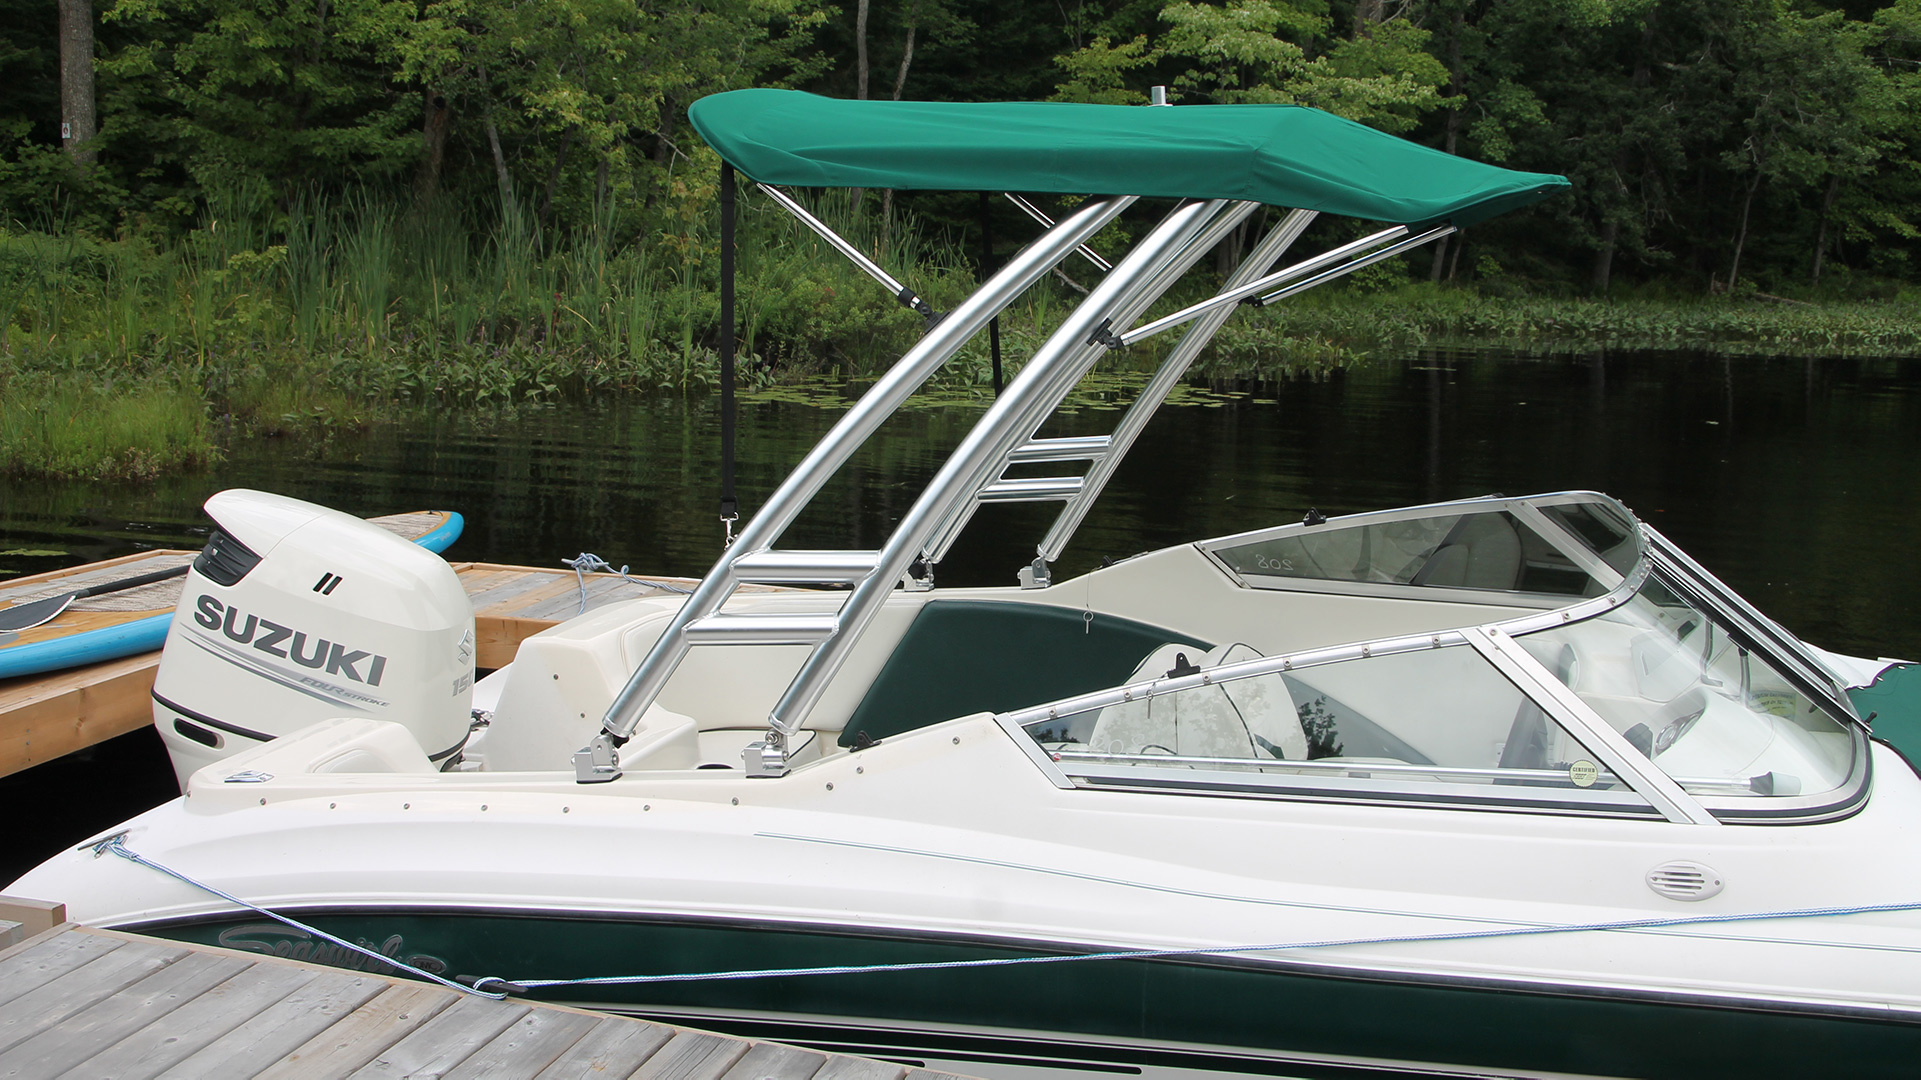
In this article, we modernize both the look and the functionality of the family bowrider with a tow tower and overhead bimini top. You may be updating your own family boat, however, we went searching for a project boat. We knew we would be installing a tow tower. After researching the various tower manufacturers, and the plethora of models available from them, paying specific attention to the mounting hardware and methods, we knew what we wanted so we factored that in when searching for our project boat. We choose the forward-facing MTK Tower by Monster Tower. The 2.5” tubes are beefy looking, available in polished aluminum, powder coated white or black, and come with a five-year warranty.
The good news is that the MTK tower will look great and install easily on virtually any boat over 16’ with a 72” to 102” beam. The only difference lies in where you will mount it to your boat. We specifically wanted our tower mounted on top of the gunwale – so we chose a project boat that had wide enough gunwales to accommodate that – but a side of the hull mount is equally good both in strength and finished appearance.
STEP 1: Gather the Parts

We began by laying out all the piece on the cardboard packing boxes on the dock and re-reading the instructions once again. This is at least a two-person project, three is ideal – the two people holding the part in position are inevitably just out of arms reach for something that’s needed. It’s important to familiarize yourself and your assistants with all the parts and their names. Lying on your back and saying “hand me that thing,” isn’t very helpful. It’s certainly a project you can involve the entire family in and complete it in an afternoon.
STEP 2: Assemble the Tower
 Using the Allen key provided, and adjustable pliers, roughly attach the tower leg pieces to the crossbar piece but don’t overtighten as you’ll need some movement at this joint to get the right spread to adjust the legs to your chosen mounting locations. If you’re going to add tower speakers (we chose two single barrel speakers from Monster Towers’ wide range of accessories), now is the time to run the wiring for them, along with the wiring for the navigation light located on the top bar with the tow rope mount. It’s easier to run a ‘fish’ to pull all the wiring through now while the parts are unassembled. Remember to thread the wire through the oval rubber grommets that seal the access holes.)
STEP 3 & 4: Test Fit the Tower
 Following the instructions, we did some rough measurements from the windshield to the intended mounting location on the gunwales, folded the tower backward (my initial thought) and decided instead to fold it forward to rest on the windshield frame. We moved our intended mounting location forward about 3 inches as a result. This part is definite three-person job – one to hold each of the legs in position on the hull and a third to “test-fold” the tower to make sure it doesn’t catch on anything. I was grateful for my wife and daughter’s enthusiastic assistance!
STEP 5: Measure twice and Drill Once

Next, mark the intended location on the hull of the mounting bases. Once you’ve got that taped off – remove any side panels from the inside of the boat (this may require you becoming some sort of a contortionist to find and loosen the hidden bolts) and check for any existing wiring or steering/throttle cables before you drill.
Assemble the mounting bases, swivel, and Heim joint at the bottom of each of the four legs, and reposition the tower onto the boat. You may need to do this a few times, adjusting the intended mounting location as you go to achieve the maximum flat contact between the hull and the mounting bases. Once you’re satisfied with this, double check there is nothing behind or inside, before you drill a hole in your boat. Remember you’ll need room for a backing plate as well inside the hull. (If your tower folds forward, install the forward mounting bases first, and vice versa.)
Using your tape and the rubber base plate as a guide, drill a 1/8” pilot hole. Always drill in reverse to prevent cracks and chips in your gel coat! Use a 5/16” drill bit, again in reverse, to make a clearance hole for the mounting bolt. Insert the bolt into the mounting base and through the hole in your hull. Use it as a guide for the second pilot hole, remove it, and drill the second hole. Reinstall the mounting base and both bolts.
Next, measure twice to ensure the other side is in exactly the same place on the hull so the tower looks symmetrical on your boat and it folds easily, and drill the holes in the same order: pilot hole and a clearance hole for the first bolt, then for the second bolt. Doing it in this order will ensure a perfect fit, without the mounting bolts binding in the clearance holes.
STEP 6: Installing the Required Back Plate.

Monster Tower requires an underdeck backing plate to reinforce the fiberglass. This is crucial to both safety (as there’s 10 G’s of force on a tower at some times) and long-term good looks. And so you don’t tear a hole in your boat!
Even though we drilled through the gunwales, which already had a piece of plywood fiberglassed in place, we still put in an additional backer plate. With a helper holding the backer plate in place from the inside, you drill from the outside to make a mark on the wood for the first clearance hole. Remove from the boat and drill through your backer plate.
Reinstall the backer plate, push the mounting bolt through and then make a mark for your second hole. Remove and drill the hole. It’s nearly impossible to get the holes in the correct place in the backer plate without taking the time to do it this way. Repeat for the other side. We chose to continue our backer plate the full distance between the front and back mounting bases.
Mix up some epoxy, coating both the top of the backer plate and the inside of the hull liberally, and install the backer plate with the mounting base, outside rubber base plate, inside rubber base plate, aluminum plate and the mounting bolts and nuts. I took an extra step and put a bead of marine silicone on the gunwales around the holes to seal any water out. Tighten the mounting bolts with the supplied Allen key and a socket wrench.
STEP 7: Attach Front Legs
 Reinstall the tower legs to the forward mounting bases as a test fit. Stand the tower up so the rear base plates are against your hull. Have someone hold the tower in place, while you adjust the Heim joint, swivel and mounting base to get the best flat mounting position to the hull. Mark the location with tape.
STEP 8 & 9: Mount Rear Legs
 Repeat the same procedure as you did in Step 6 to drill and install the rear mounting bases. If in the previous step, you chose to continue your backer place from the forward base plates, then it’s easier to drill through the backer plate this time because it’s already held up in place. Do this step quickly so you tighten the mounting bolts while the epoxy is still wet, so it adheres to the underside of the deck before it cures. Repeat for the other side.
STEP 10: Add the Bimini Top
 While the MTK tower looks incredible on its own, we opted to add the overhead bimini top in green to match our boat and cover, and two speakers. (We’ll show you how to connect the speakers to a new Fusion stereo and amp in an upcoming article.) Installing the bimini was very easy, the instructions were simple to follow, and the final fit was tight and perfect.
STEP 11: Square the Tower
 The final step is to install the four remaining bolts to lock the legs in place with the crossbar. To do this, you need to have an assistant help with ‘squaring up’ the tower. Measure from the port side forward base plate to the starboard side bolt up at the crossbar, then from the starboard side forward base plate to the port side bolt up at the crossbar – both measurements need to be the same for the tower to be square on your boat. Push the tower side-to-side gently to adjust as necessary and re-measure.
Take your time to do this and once you’re satisfied, tighten the existing four crossbar bolts. Then using the supplied 10mm drill bit, drill just a little into the aluminum to create a starter hole through the legs using the empty/second countersunk hole in the crossbar. Switch to a smaller drill bit, drill the hole all the way through, and then expand the hole with the 10mm drill bit.
Have an assistant hold a large bucket under where you’re drilling to catch (most of) the aluminum shavings. Install the tower lock bolt and tighten. Repeat for the other three lock bolts. Once the final four bolts are installed to stabilize the join between the top and sides I found the MTK to be rock solid. Reinstall the bimini.
SUMMARY
 The instructions that Monster Tower provided with the MTK Tower and Bimini were very precise. (You can download them for free before purchase from their website.) I have to give Monster Tower full marks – an A++ – there was nothing left out, or vaguely worded so that I was left to guess what was meant, or try to figure out on my own how they got from one step to the next.
Our final step was to install the wakeboard and water ski racks (also accessories we opted for from the Monster Tower website) and to test it out. We headed out onto our lake and with me at the helm, my nephew did the honors. On the inaugural run, at 170 lbs, he wakeboarded behind at various speeds doing several tricks and jumps on and across the wake. The tower didn’t flex or move, the deck joint didn’t budge – it was indeed rock solid.
Next, I traded him spots and at over 200lbs, I water-skied. It’s nice to have the tow rope completely up out of the water for your deep water starts – it makes such a difference compared to when it is buried in the prop wash. Later, after several runs, we compared notes back at the dock. We both said we felt no hesitation in the line, no flex from the tower at any point, it didn’t matter if we were directly behind the boat or pulling diagonally out to either side. It’s a solid steady predictable pull transferred straight to the skier directly from the prop.
The MTK tower itself is absolutely silent. Nothing rattles, shakes, or shimmies, and with the green bimini, it truly looks like a factory installed option against our boat’s stainless windshield frame. Total install time: 4 hours for the tower and an hour for the bimini.
Project Update So Far:
We installed the 150hp Suzuki four stroke outboard in the late spring and used it all summer cruising around the lake, tubing, wakeboarding and for an evening after dinner sunset cruises. It started reliably every time, never missed a beat and was so quiet that every guest we had aboard commented in some way about it. I was so impressed with the power to pull me up water skiing, to pull the kids tubing and to pull my nephew wakeboarding at 12mph with a very nice wake.
The 20-hour oil change reminder light came on just as we put it on the trailer this fall at haulout. I kept a record, and we used a total of about 286 liters of premium gasoline (no ethanol blend) in those 20 hours, for an average fuel consumption of 14.3 L/hour combined – very impressive. (What’s equally impressive is that the old two-stroke used at least double that amount.) The bimini top offered some welcome shade on hot summer days, and the tower got many compliments at our local marina’s gas dock.
What’s Next?
In the next installment in this mini how-to series, we’ll choose and show you how to hook up the tower speakers to a new Fusion Stereo and amp, replace the old speakers in your boat, add a Lowrance HDS Carbon fishfinder, and wire in some cool LED courtesy lights, as we continue to update the family bowrider.
Keyword : best boat, Best boat buying website, best boat marina website, best boat travel website, best place to rent a boat, boat accessories, boat angler, boat boondocking, boat buyers guide, boat camper, boat camping, boat dealers, boat DIY, boat Fishing, boat Fixer, boat Home, boat information, boat insurance, Boat Maintenance, boat marinas, boat marinas in Alberta, boat marinas in BC, boat marinas in Canada, boat marinas in Manitoba, boat marinas in Saskatchewan, boat marinas in the USA, boat marinas near me, boat products, boat rentals, boat repair, boat road test, boat sharing, boat sites near me, boat supplies, boat Tech, boat tips, boat touring, boat trade, boat Travel, boat traveling, boat travelling, boat vacation, boat vacation cost, boat websites Canada, boating Canada, Boating Canada’s Boat Lifestyle Magazine, Boating Lifestyle Magazine, boating website, Bow Rider, Canadian marina websites, expert boat information, find a boat dealer, how much does a boat cost, how much does marina cost, how to choose a boat, how to drive a boat, marina products, marina supplies, Monster Tower, motor boat, power boating magazine, Project, top boat website, used boat reviews best boat, Best boat buying website, best boat marina website, best boat travel website, best place to rent a boat, boat accessories, boat angler, boat boondocking, boat buyers guide, boat camper, boat camping, boat dealers, boat DIY, boat Fishing, boat Fixer, boat Home, boat information, boat insurance, Boat Maintenance, boat marinas, boat marinas in Alberta, boat marinas in BC, boat marinas in Canada, boat marinas in Manitoba, boat marinas in Saskatchewan, boat marinas in the USA, boat marinas near me, boat products, boat rentals, boat repair, boat road test, boat sharing, boat sites near me, boat supplies, boat Tech, boat tips, boat touring, boat trade, boat Travel, boat traveling, boat travelling, boat vacation, boat vacation cost, boat websites Canada, boating Canada, Boating Canada’s Boat Lifestyle Magazine, Boating Lifestyle Magazine, boating website, Bow Rider, Canadian marina websites, expert boat information, find a boat dealer, how much does a boat cost, how much does marina cost, how to choose a boat, how to drive a boat, marina products, marina supplies, Monster Tower, motor boat, power boating magazine, Project, top boat website, used boat reviews